CONNECTICUT WEDDING PHOTOGRAPHER | NEW ENGLAND PHOTOGRAPHER | SAVING YOUR DIGITAL PHOTOS
Saving your digital photos is one of the most important things you can do after you receive your gallery. This blog will walk you through different ways to store your photos and the steps for downloading your gallery.
So, you’ve just received your full gallery from your session/wedding day, woohoo! Time to celebrate and relive the best day ever!
After looking through all of your photos you may be wondering what the best way is make sure you have your photos for years to come. You’ve made an investment for these special photos so I want to make sure you have everything you need to ensure you can cherish your photos for a lifetime.
Your gallery will be available online for you to view, share, and download for 3/6 months, so I recommend downloading your photos as soon as possible. After this time, your photos will be taken offline so I am able to make room for other clients’ galleries. Don’t worry though, I always send an email to my clients to double check that they’ve downloaded their photos and to let them know their online gallery will be expiring.
The intention for this guide is to share the best practice for making sure your photos are preserved for years to come and answer some common questions about saving digital photos.

Important Things to Know
What should I do with my gallery link?
Feel free to share the gallery link with any family or friends, along with the passcode. Anyone with access will be able to save a list of their favorite photos and download them to their devices. The direct link can be copied by selecting the Share button at the top of your gallery.
How long are the photos hosted on the gallery for?
Your wedding photos will be hosted on the online gallery site for a duration of 3/6 months. During this time, you can download, share, and order prints of your photos as you please. After this period, the gallery link will expire. To ensure you have access to your photos beyond this point, consider downloading and backing up your pictures.
Where should I save my photos to and how many backups should I have?
When it comes to backing up your precious memories, the rule of thumb is: the more backups, the better. Here are some suggestions on how to ensure your photos are protected and can always be viewed:
a. Local Storage: Start by saving the high-resolution image files to your computer and even some to your cell phone if you want to make a post to social media. This way, you have immediate access to your photos.
b. Hard Drive Storage: If you want to store your photos locally but not on your personal computer, a flash drive or hard drive is a great solution. I recommend something with at least 16GB or more to have enough storage space for your photos. This USB or USB-c flash drive will work perfectly!
c. Cloud Storage: Consider uploading your wedding photos to a reputable cloud storage service such as Google Drive, Dropbox, or iCloud. This provides an additional layer of security in case of hardware failure or loss.
d. Physical Copies: If you want to take your photo preservation to the next level, you can create physical copies of your favorite prints. This could be in the form of a wedding album or framed photos, which you can purchase from the print store connected to your online gallery.
HOW TO DOWNLOAD YOUR PHOTOS: COMPUTER
To deliver photos, I choose to use a website system called Pixieset which offers private, password-protected galleries to my clients. It’s modern and easy to use on PC, Mac, Smart Phones or Tablets. It’s great for viewing, sharing and downloading your photographs as well as ordering professional prints and wall art.
With Pixieset, you can easily download straight from your Collection to your device, Google Photos, or Dropbox.
IMPORTANT PRINTING INFORMATION
If you decide to print on your own, PLEASE be sure to download them on your desktop and then send those images to your printer. The software recognizes what type of device is being used to download them. So, by downloading them on your desktop/computer, they will be downloaded in the higher resolution which will make for better quality prints.
If you download them on your phone, and then send them to the printer from your phone, they will be in a very low and poor quality and the prints will not turn out as well.
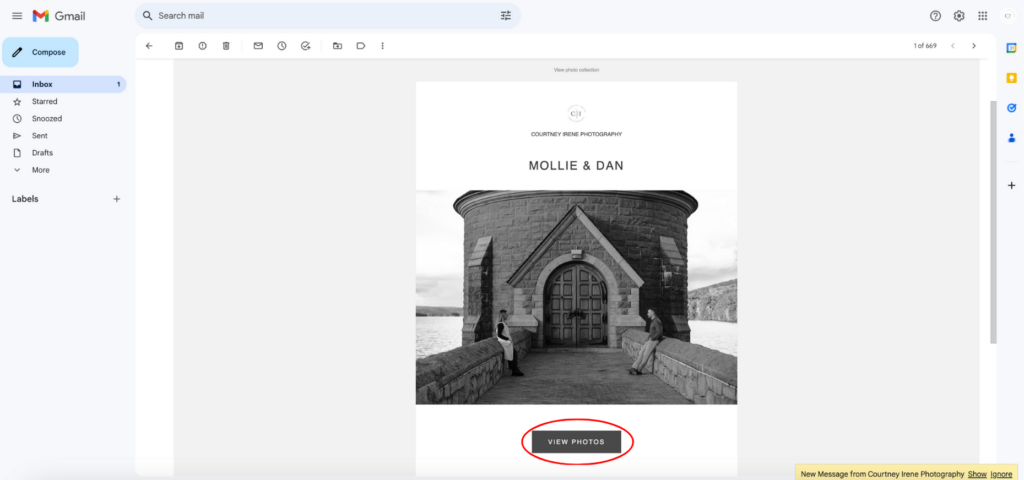
STEP 1: Open your Pixieset Gallery. Once your photos are ready, you will receive an email link with a password and/or PIN code.
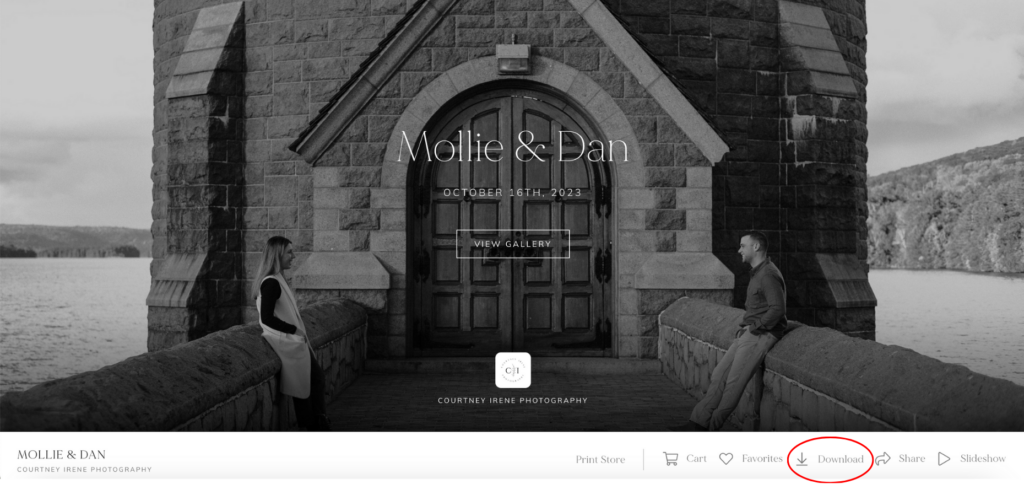
STEP 2: FOR FULL GALLERY DOWNLOAD, simply click on the Download icon shown at the top right of the Gallery view.
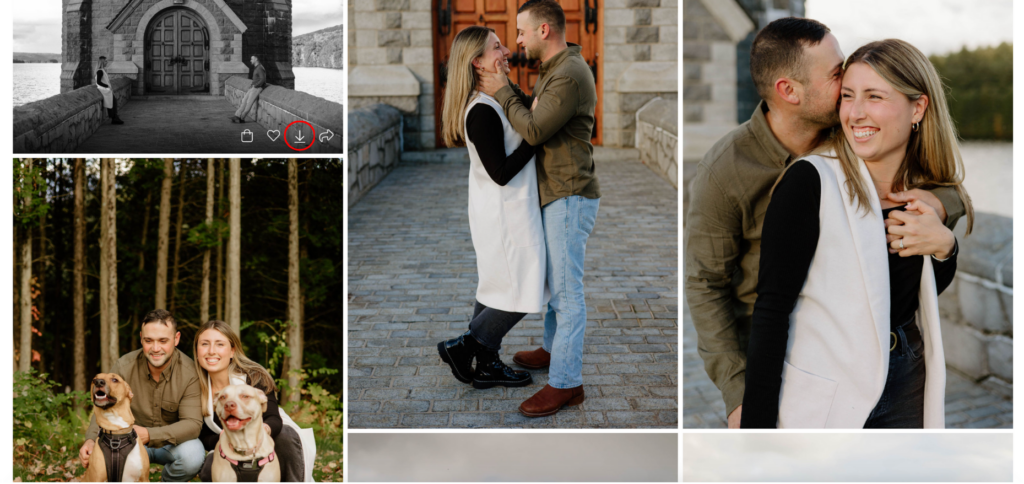
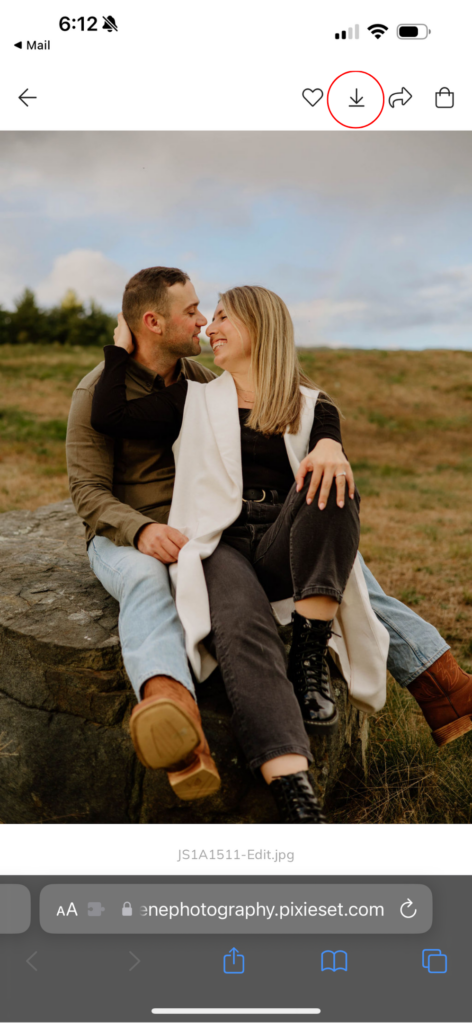
2a. FOR SINGLE PHOTO DOWNLOAD, you can either hover over the photo and click the Download button while it’s still in gallery viewing mode OR you can click the image you want to download and click on the Download Icon located on the individual image you would like to download.
STEP 3: Enter your email address and/or download pin where prompted.

STEP 4: Confirm the set or individual photo you wish to download along with the download size and location, ie to your machine or Dropbox or Google Photos (which are both free cloud services).
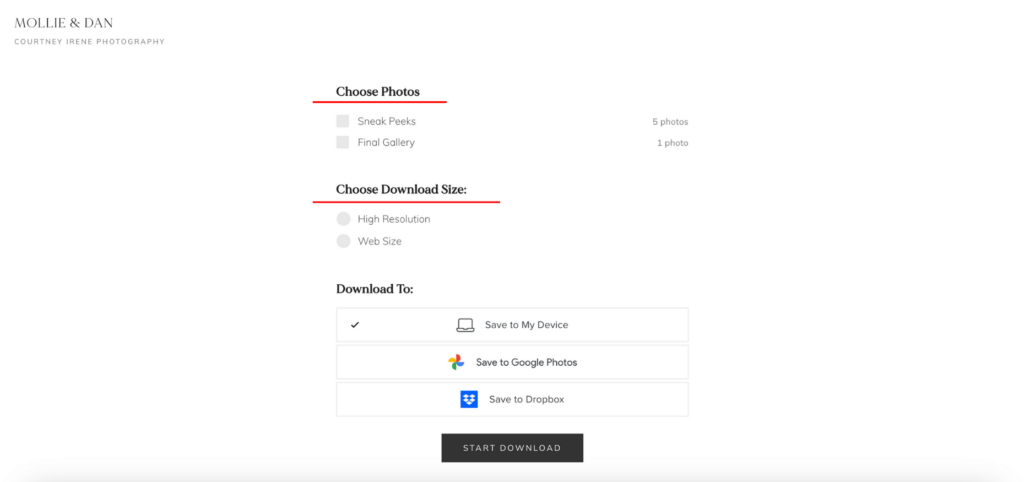
Here’s an explanation of the different sizes straight from Pixieset:
Web Size
Web Size versions of the image are available in 3 resolutions: 640px, 1024px, and 2048px on the width. The Web Size files are much smaller and therefore are faster to download and upload. They are ideal for sharing on Social Media or for quick viewing. If your client will be sharing their photos on Facebook, the 2048px is the optimum resolution as it is the widest pixel width that Facebook will allow.
The 2048px width is only available for Collections created after August 2nd, 2016. All Collections from before that date will not have this option available.
High Resolution
High Resolution photos are 3600px on the long edge. They can typically be used to print photos up to poster size canvases (though this will depend on the original file size), and are more than sufficient for web use. Our goal is to optimize the file delivery process and make file storage easier for your clients; with High Resolution photos, your clients are able to obtain high quality images while enjoying a much faster download experience with files that are easier to manage.
Original
Original images are, as the name suggests, the original files exactly as you uploaded them. This will provide your clients with the full resolution files you have uploaded, without any compression or resizing. These files take up more space, and will take much longer to download.
HOW TO DOWNLOAD YOUR PHOTOS: PHONE
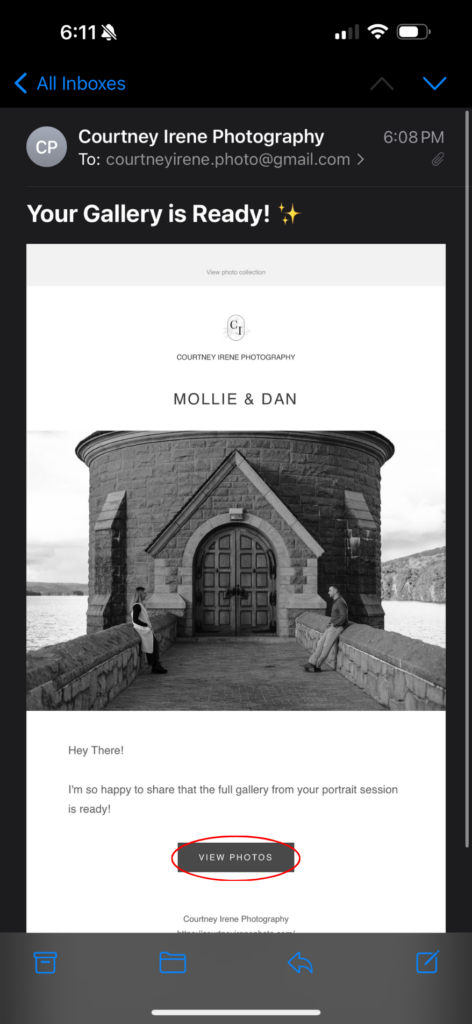
STEP 1: Open your Pixieset Gallery by using the link in your email or over text message. Once your photos are ready, you will receive an email link with a password and/or PIN code.
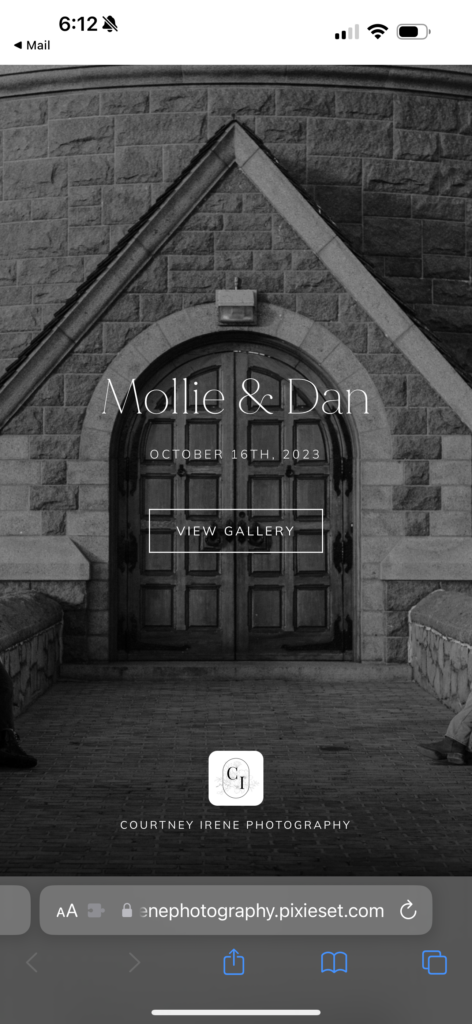
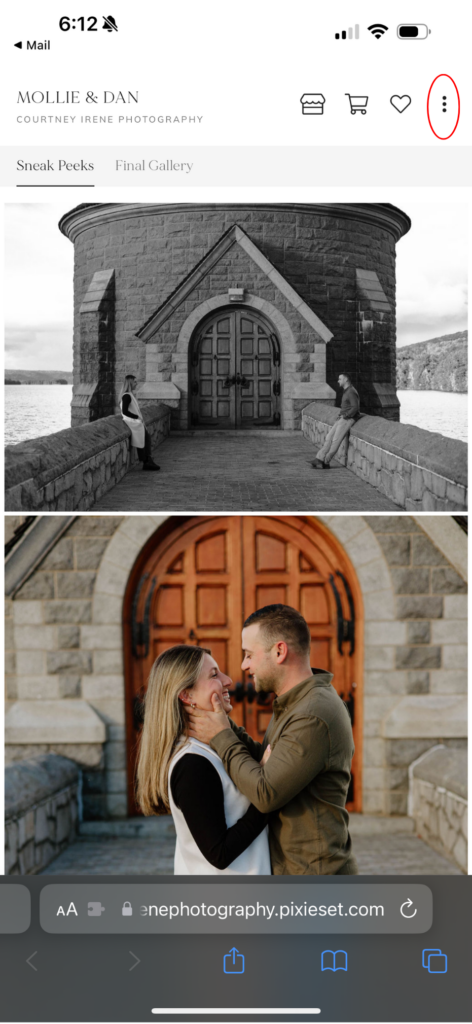
STEP 2: FOR FULL GALLERY DOWNLOAD, simply click on the 3 vertical dots and select Download from the dropdown menu.
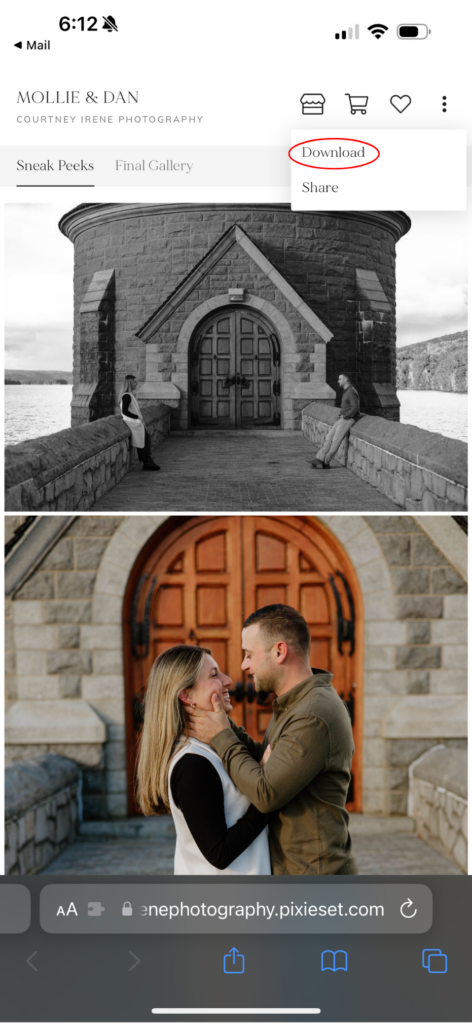
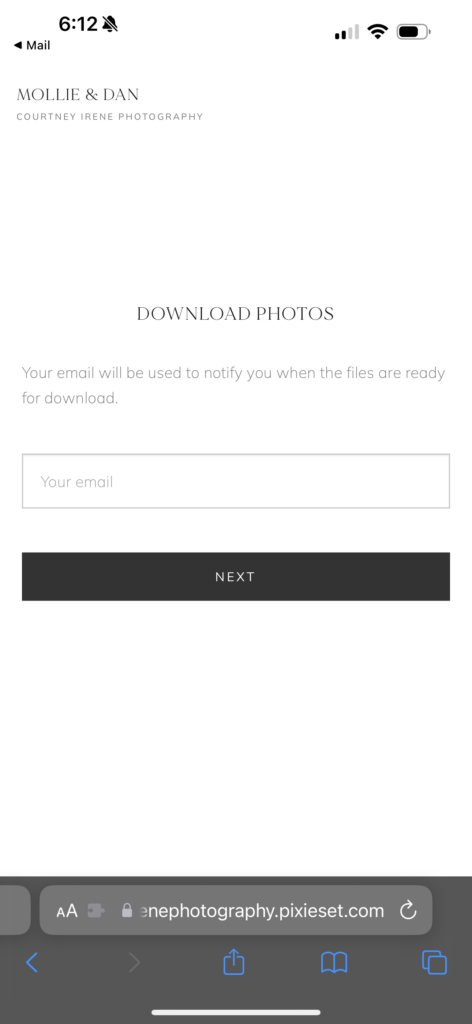
STEP 2 Continued: Enter your email address and select Next. Select from the available sets to download, the preferred resolution, the download location, and select Start Download.
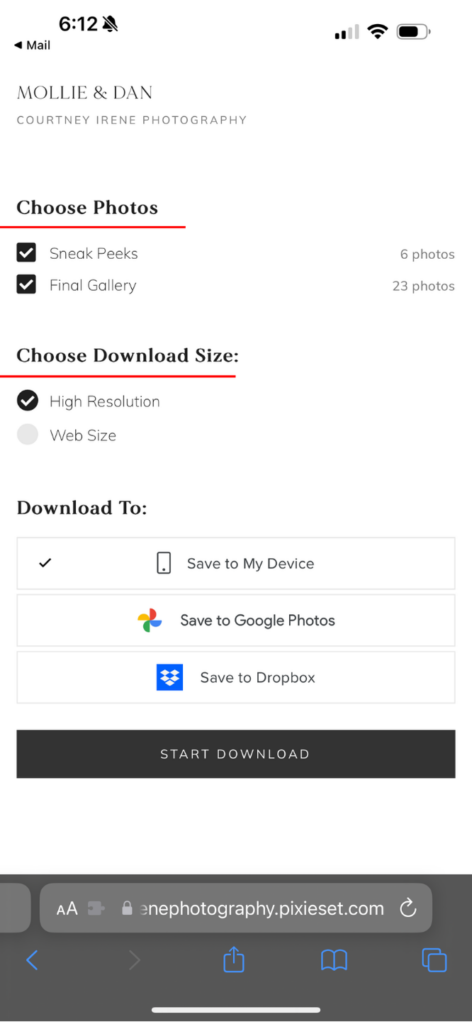
STEP 2 Continued: Click on the zip file shown on the screen and select Download.
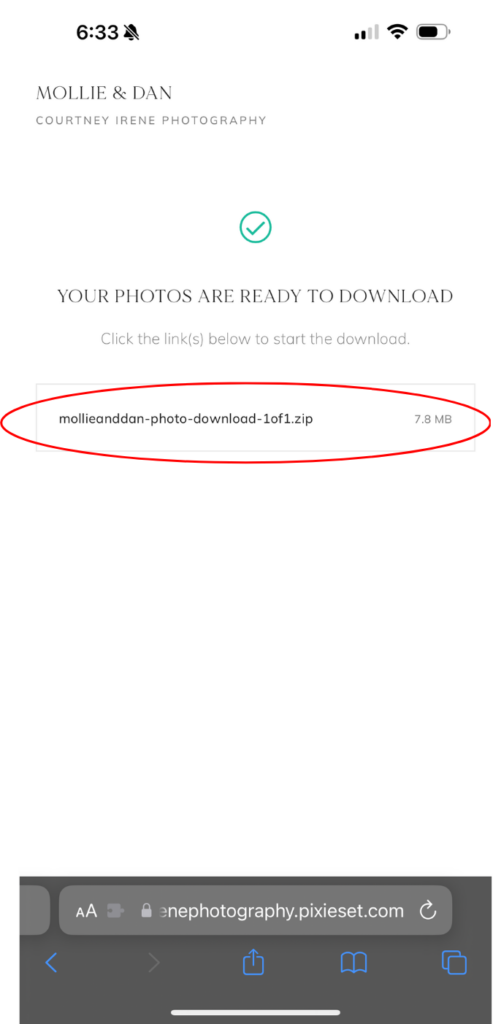
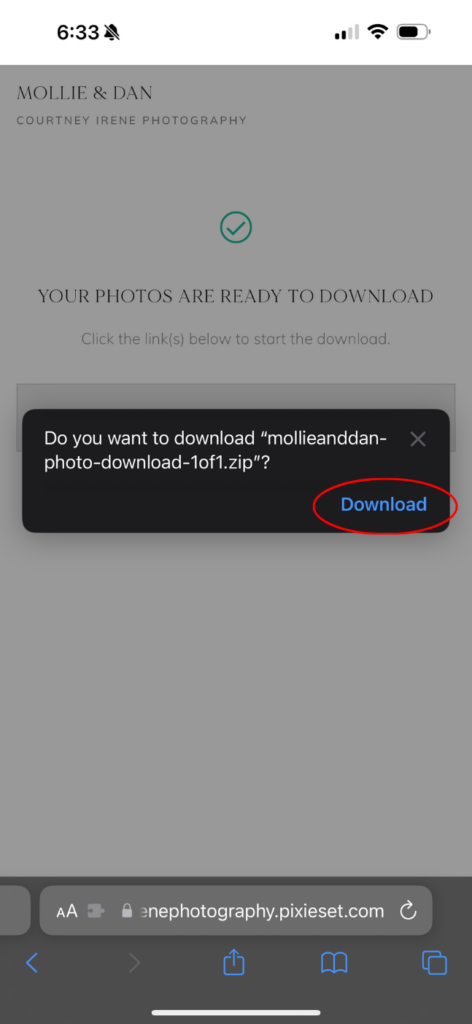
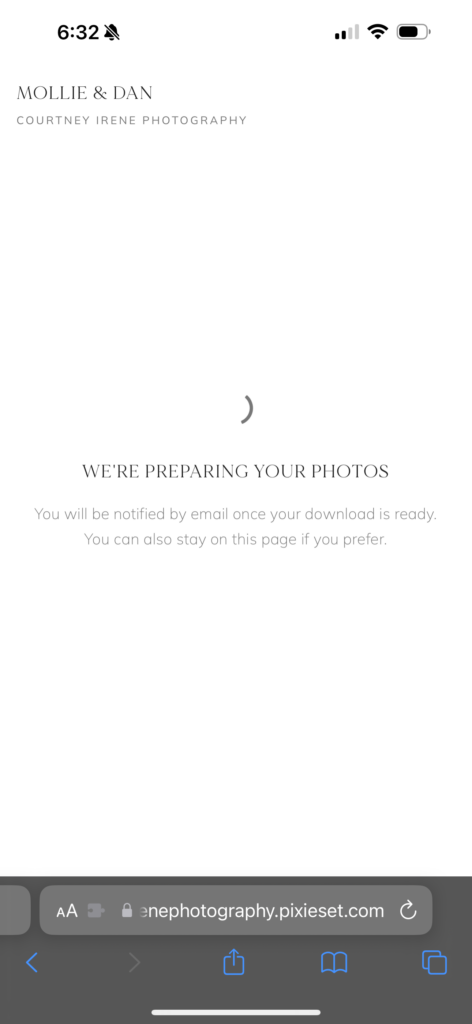
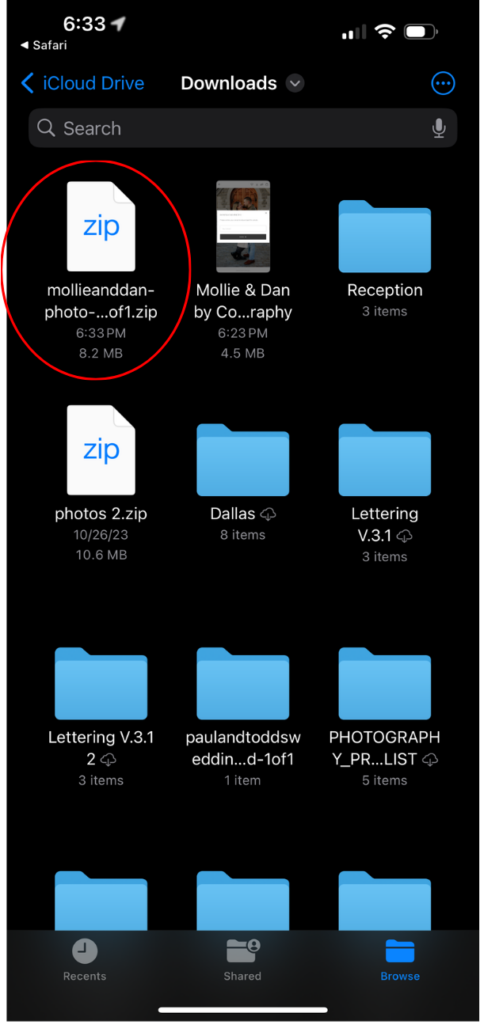
STEP 2 Continued: Once the download is done loading, click the down arrow next to the URL and select Downloads from the menu. Click on the zip file that appears and this will bring you to your Downloads folder in the Files app
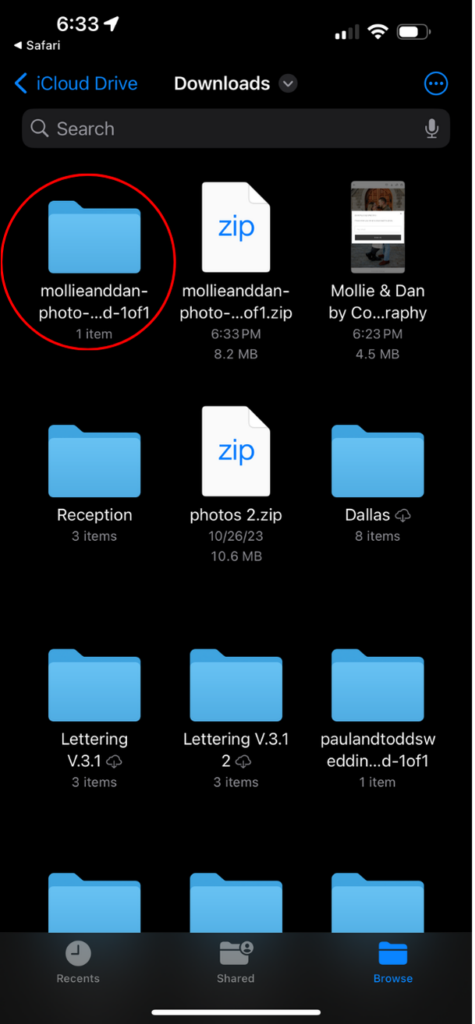
Once you’re in your Downloads folder, click the zip file to open it, doing so will turn the zip file into a folder. Click on the folder to open it.
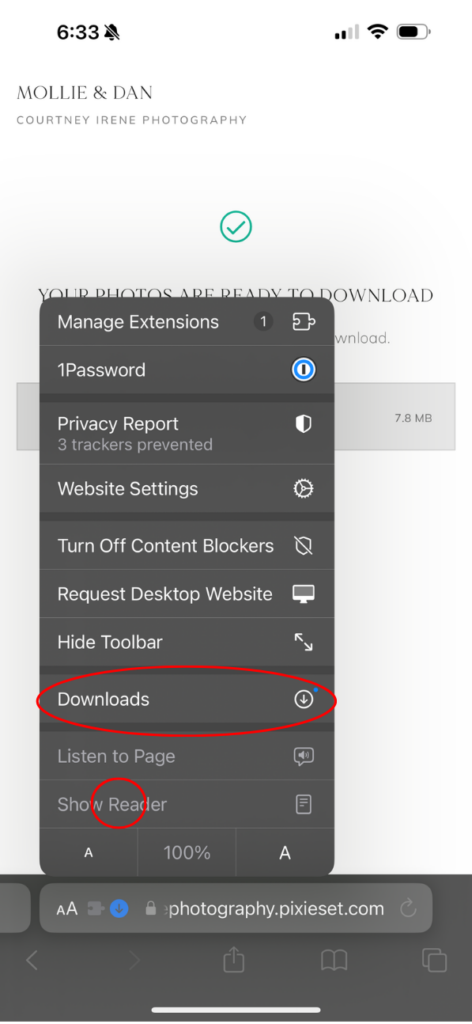
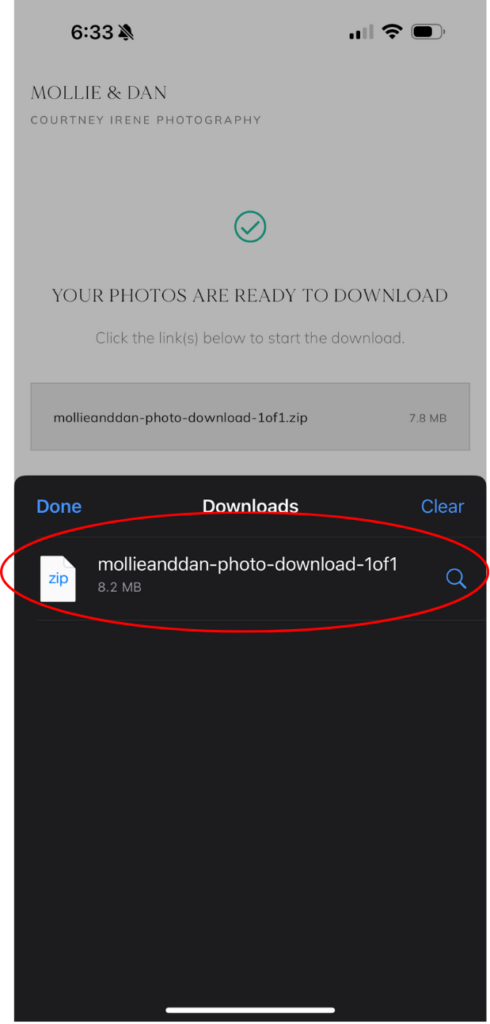
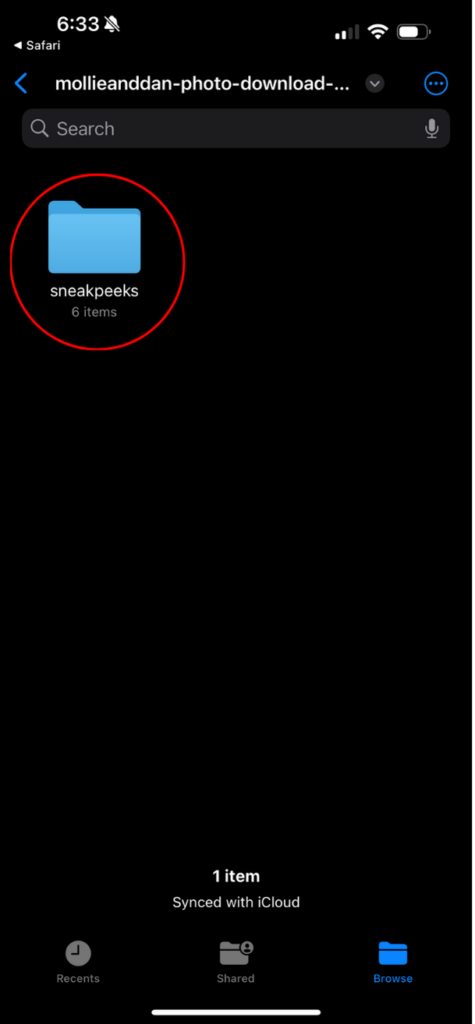
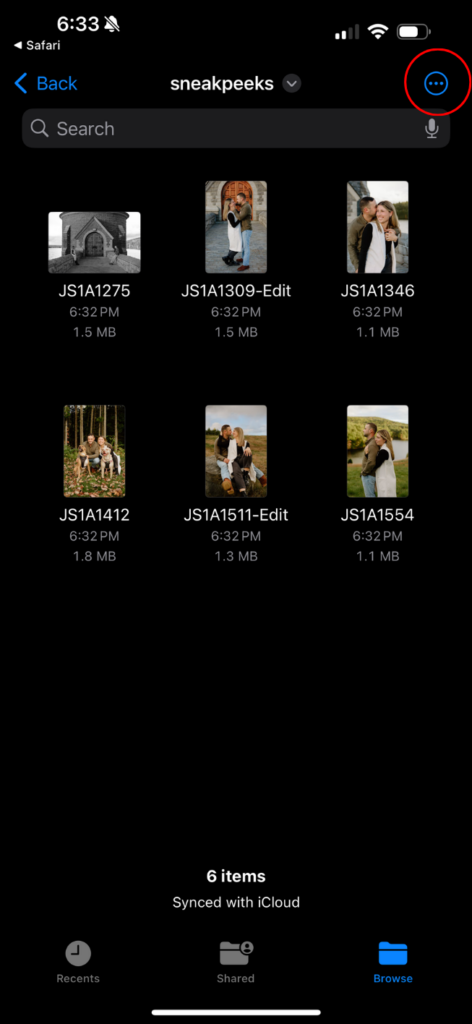
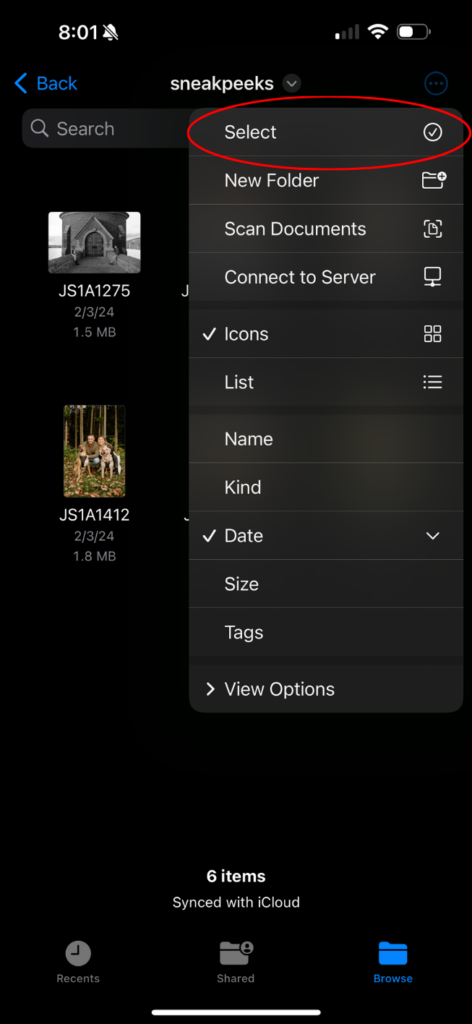
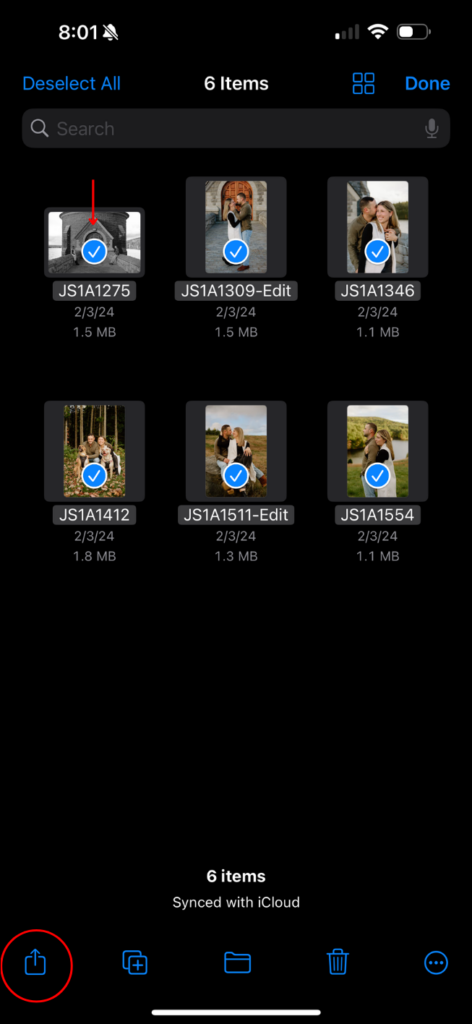
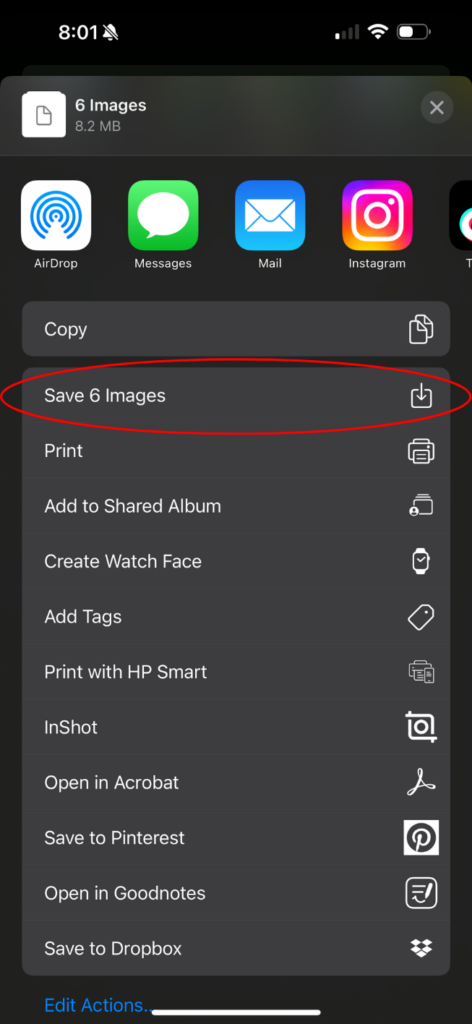
STEP 2 Continued: When you reach your downloaded photos, click the 3 dots in the upper right hand corner and choose Select. Tap each photo so that you see a blue checkmark over all of the photos. Click the Move button on the bottom left hand corner and select Save 6 images from the menu.
2a. For Single Photo Download, you can either hover over the photo and click the Download button while it’s still in gallery viewing mode OR you can click the image you want to download and click on the Download Icon located on the individual image you would like to download.
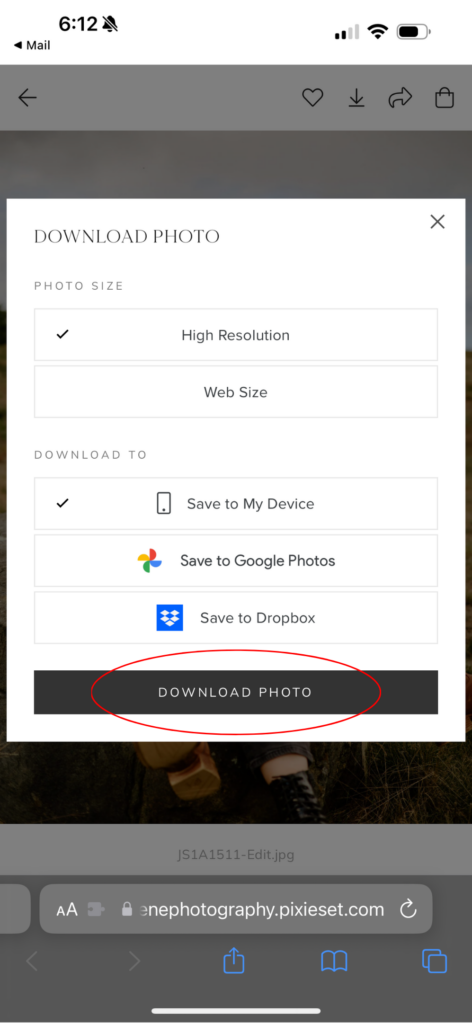
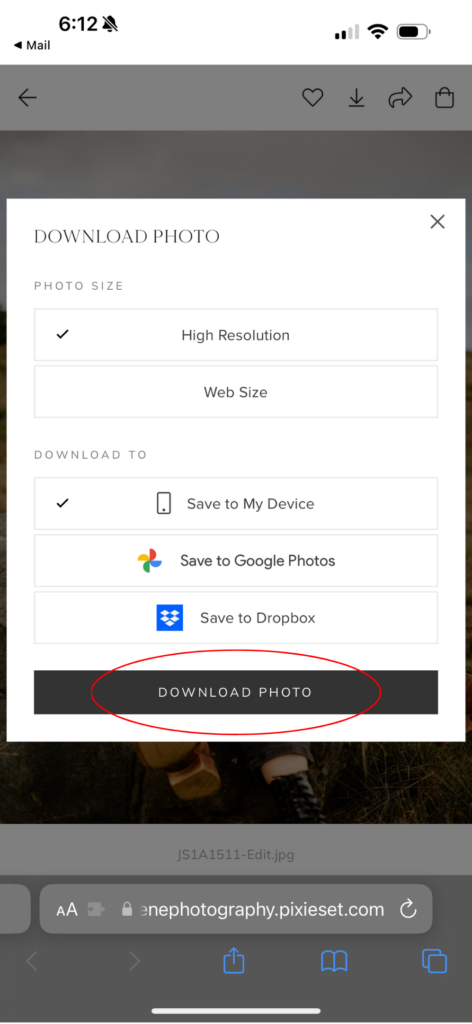
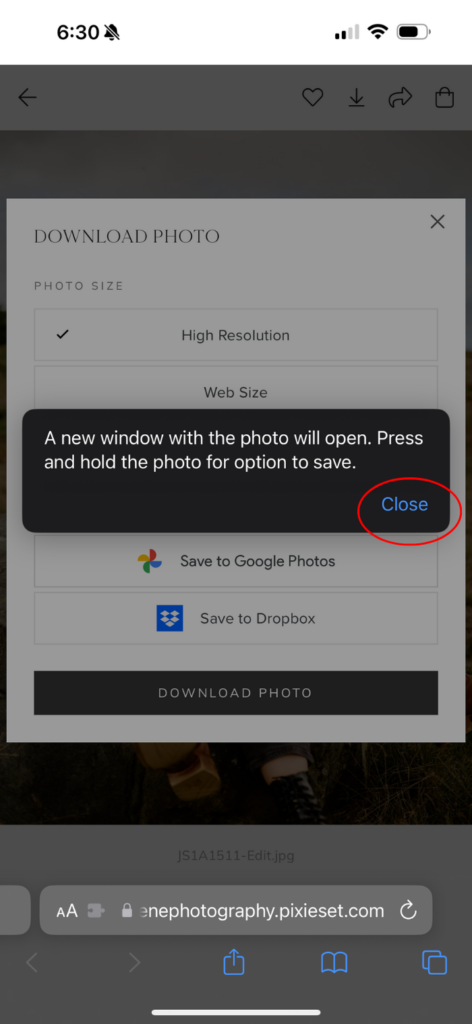
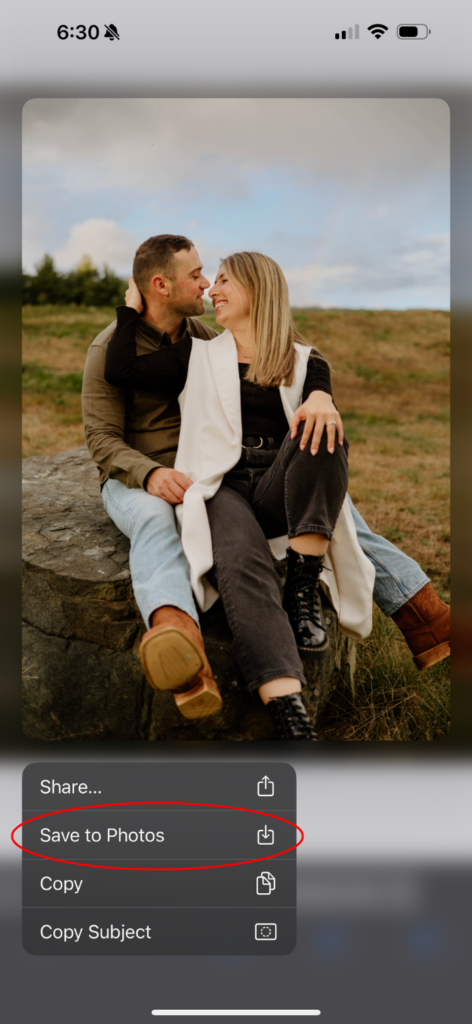
2a. Enter your email address and tap Sign In. Select your resolution and download location and tap Download Photo. This will lead to a message that states “A new window with the photo will open. Press and hold the photo for the option to save.” Tap close and the new window with the photo will automatically appear. Press and hold the photo and select Save to Photos from the menu.
AND THAT’S EVERYTHING YOU NEED TO KNOW ABOUT SAVING YOUR DIGITAL PHOTOS!
I hope this guide was helpful! I want to make sure you always have access to your photos and the best way to ensure you do is to download your photos from your gallery.
If you’re looking to book an engagement session in Connecticut or New England, check out my engagement session details page or fill out my contact form.